Adapted from the Better Homes & Gardens Cookbook (1960)
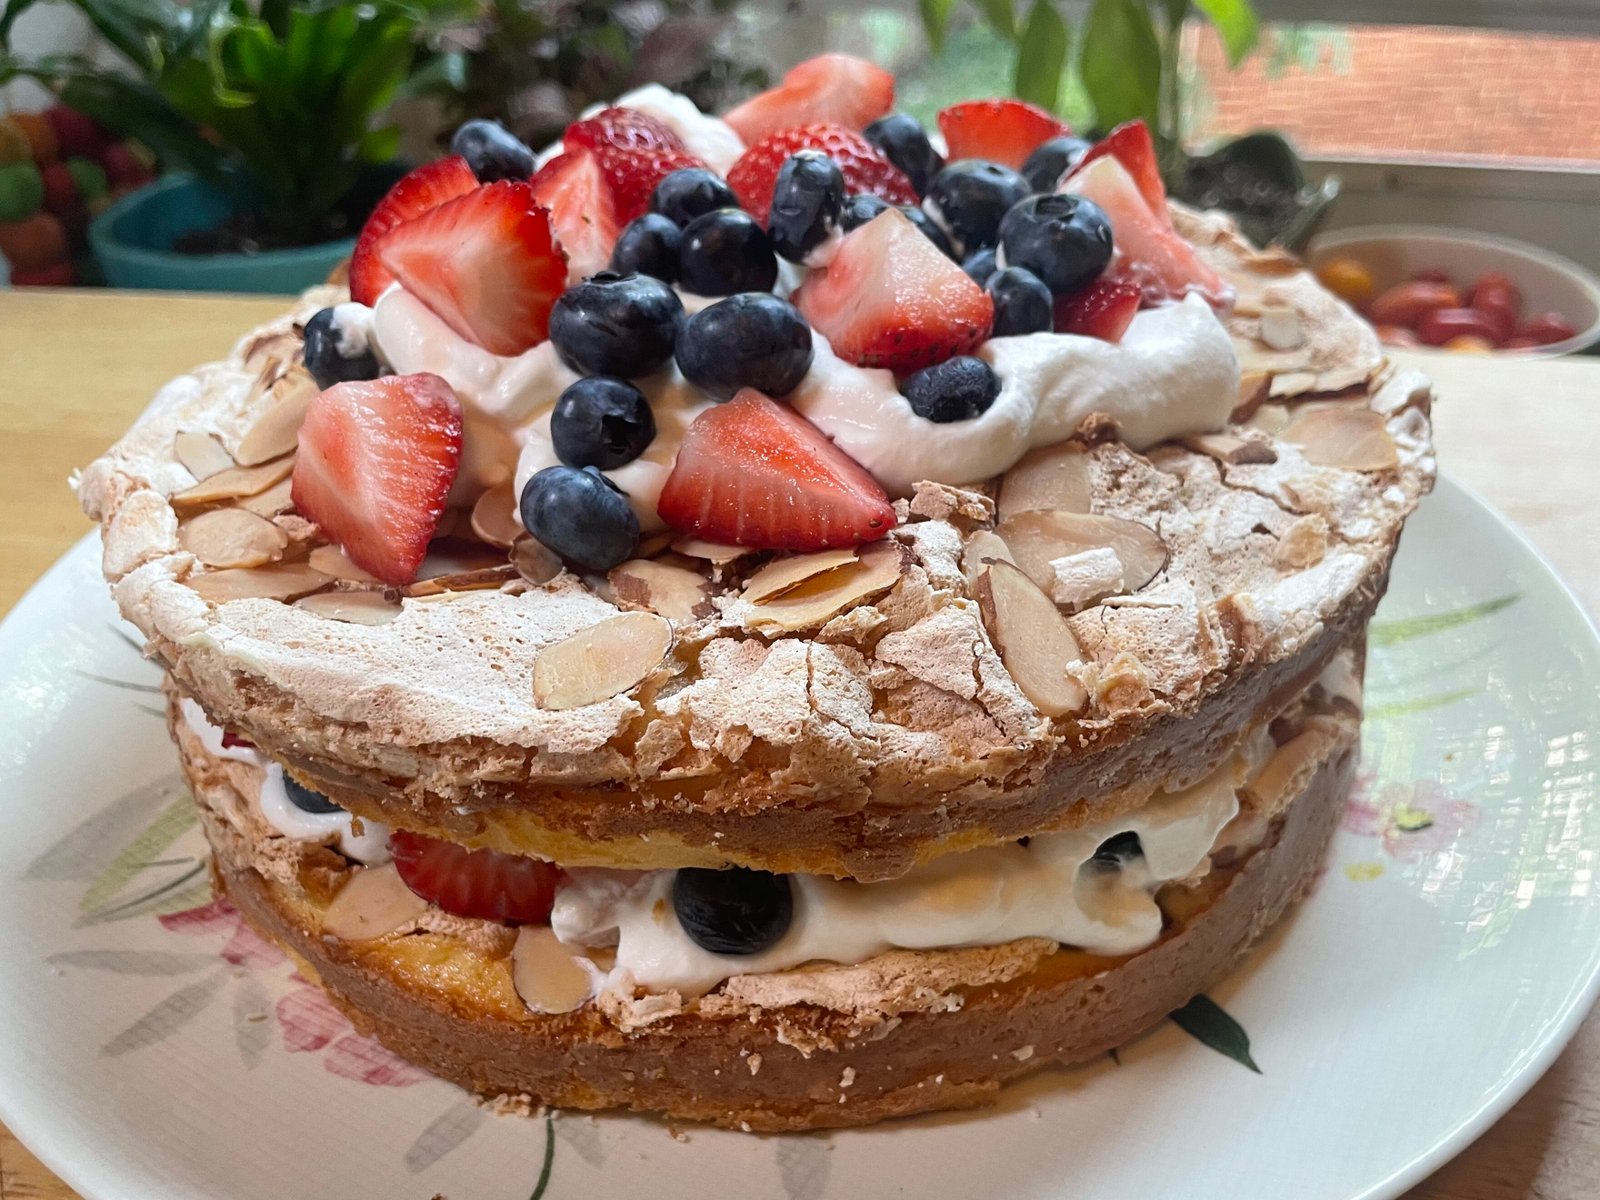
Meet chantilly cake’s messy cousin…with some secrets!
Sure, they’re in the same family. There’s the soft vanilla cake, strawberries and blueberries, and a luscious filling. But this one has a few mysteries tucked inside.
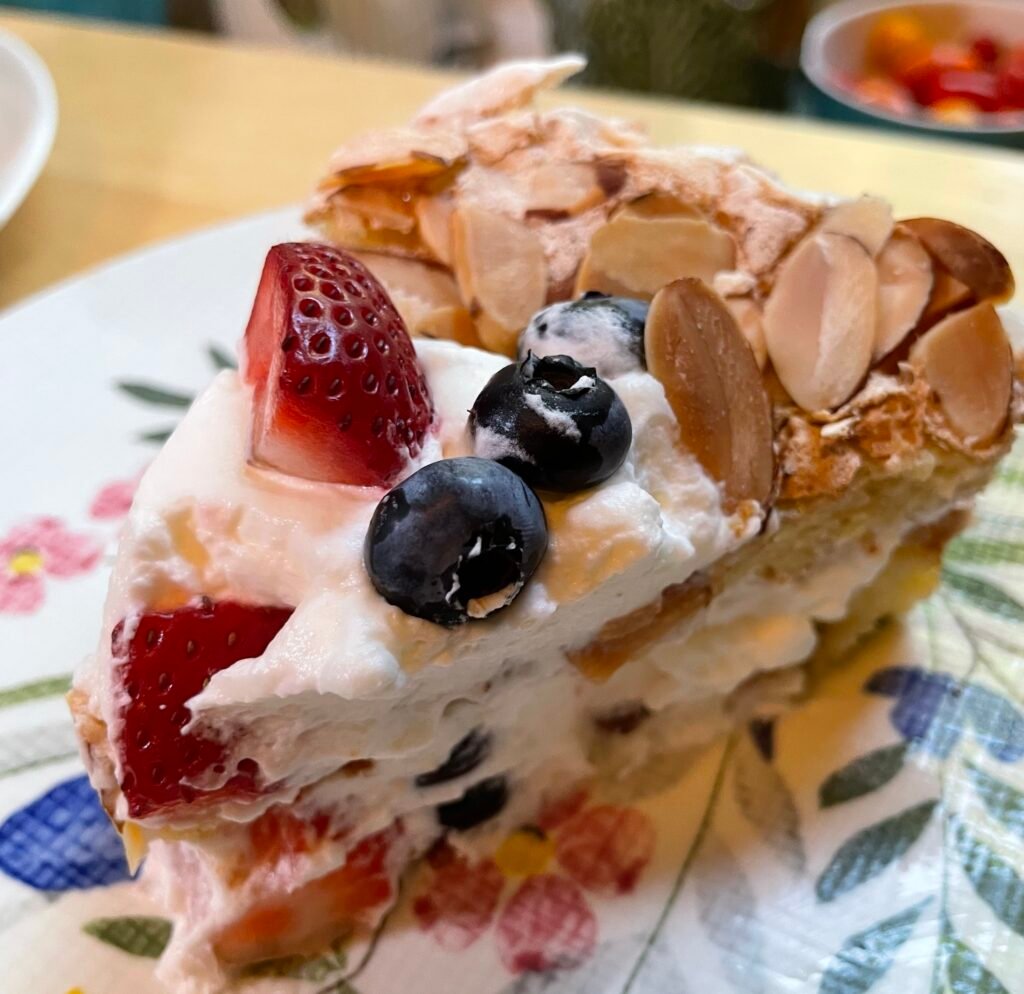
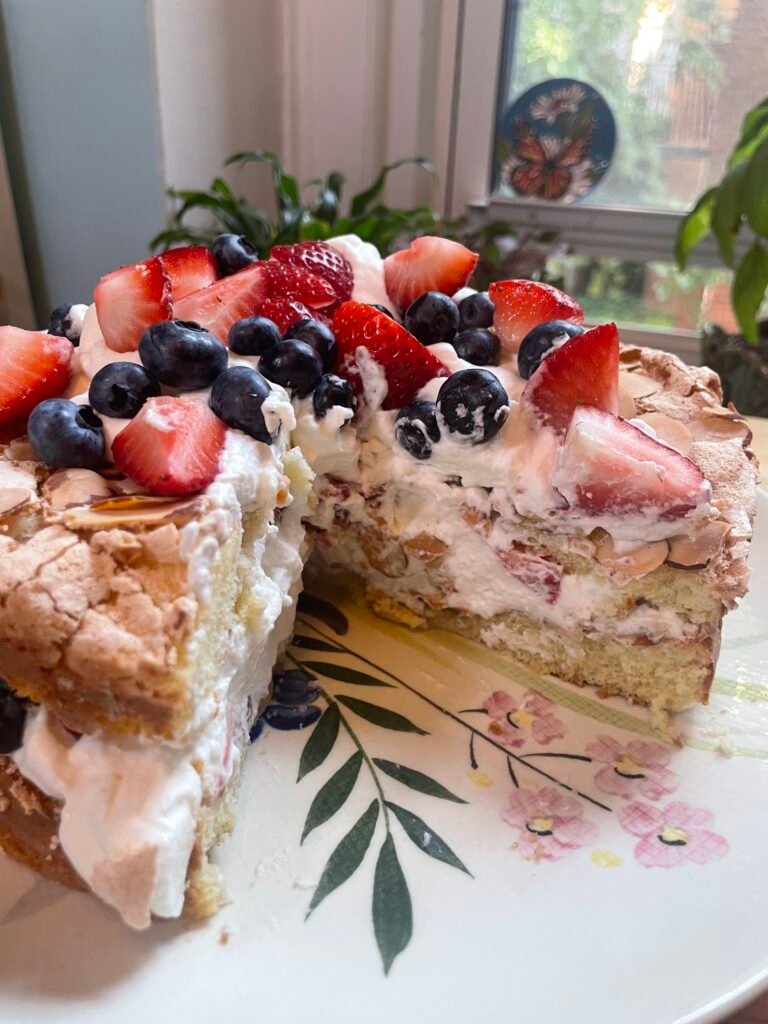
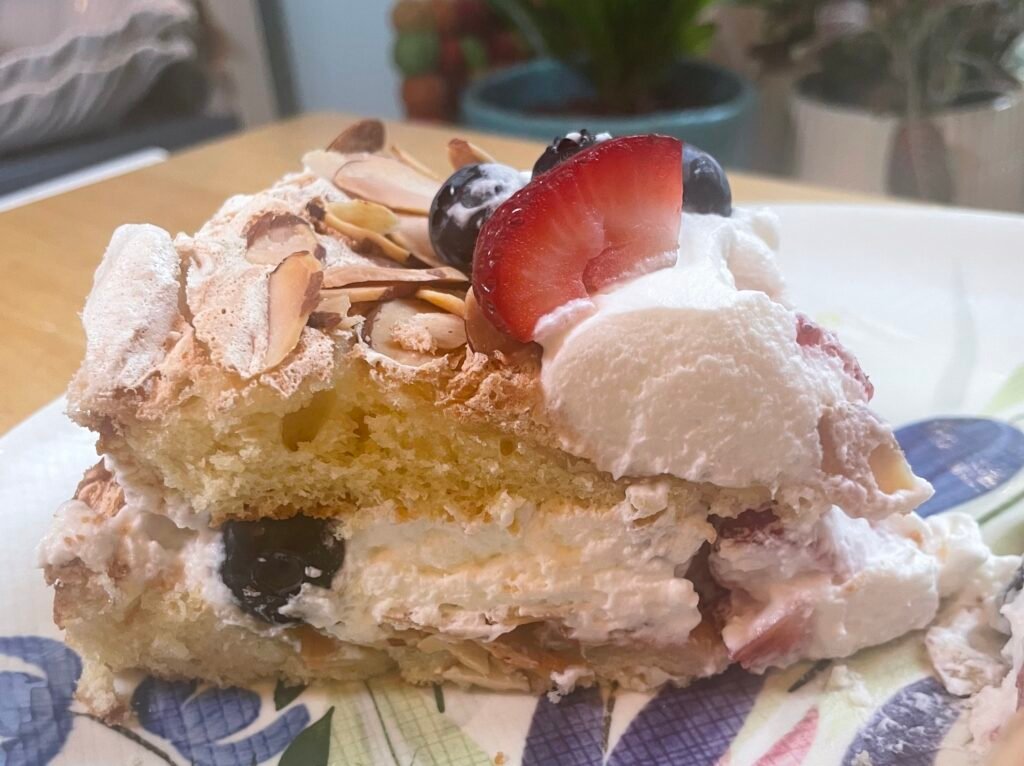
Her posture’s not so great — she’s a little slouchy and casual. Just one layer plopped on top of the other, with almond-scented whipped cream and berries in the middle. No need to ice this cake. She’s delicious without.
Now for her secrets: there’s a layer of meringue baked right on top of each cake layer, and that’s topped with sliced almonds. It all bakes together at the same time — just a little magic trick in the oven.
The thin cake layer is soft and buttery, the meringue brings a subtle chew, and the almonds add a toasty crunch. Add in the soft whipped cream and bright berries, and you’ve got a perfect combination of textures.
This is a Party Meringue Cake — also known as a blitz torte — that I found in my favorite dessert cookbook from the 1960s. I am in love with this cake, and while she does look a little sloppy (and is so hard to photograph!), she is a must-bake.
Some blitz torte recipes include a layer of custard — this one doesn’t call for it, and I think it’s delicious without that added embellishment…and a lot less work, too!
Preparing the cake and the meringue
The base is a classic yellow butter cake — light, tender, and fine-crumbed, similar in style to a Victoria sponge, just a bit thinner since it’s meant to be a shallow layer under the meringue and filling. It comes together quickly with no special ingredients required.
After dividing the cake batter between the two 8-inch pans, whip up the meringue — taking your time adding the sugar slowly to avoid graininess. It should be glossy and hold stiff peaks.
Baking and cooling
The magic really happens in the oven…
The magic really happens in the oven. Spreading the meringue over the wet batter takes a little nudging, but I found an offset spatula or spoon helped. Just take it slow — it’s fine if some streaks of batter break through, and don’t worry about getting the meringue all the way to the edges. I left a little rim of batter showing around the edge, and it worked out well.
Since the layers are so thin, they bake up quickly — about 20 to 25 minutes. Once out of the oven, let the cakes sit in the pan for 10 minutes, then remove them and place on a wire rack to cool. A flat spatula is helpful here too — use it to gently lift the cake out, and to peel away the parchment from the bottom so the cake doesn’t get soggy. Just slide the spatula between the cake and the parchment and gently wiggle the paper free.
Assembling the cake
Let the layers cool completely before filling with whipped cream and berries. This cake is best assembled right before eating and enjoyed the same day.
I used chopped strawberries and blueberries, but any summer fruit would be lovely. I didn’t sweeten the berries, since the meringue and cake already bring plenty of sweetness — and patting them dry before adding them to the cake helps prevent weeping. I also added a splash of almond extract to my whipped cream to echo the almonds in the cake, though vanilla would be nice too.
Storing leftovers
If you have leftovers, loosely cover with plastic wrap or store in an airtight container and refrigerate. It’s best eaten within 1 to 2 days — the whipped cream should hold up reasonably well, but the meringue layer will gradually soften and turn a bit sticky as it absorbs moisture from the fridge and cream, and the berries will start to release liquid.
What are you waiting for — go make this cake!
Party Meringue Cake (Blitz Torte)
Ingredients
Cake
- 1 cup cake flour all purpose flour can be used in a pinch, although the cake will not be as light
- 1½ teaspoons baking powder
- ¼ teaspoon salt
- ¼ cup salted butter softened
- ½ cup granulated sugar
- 2 egg yolks lightly beaten
- 1 teaspoon vanilla
- ½ cup milk
Meringue
- 2 egg whites
- ½ cup sugar
- 1 cup slivered almonds
Filling/Topping
- 3 cups berries if using strawberries, slice them into pieces first
- 1 cup whipping cream
- 2 teaspoons sugar or more to your liking
- ¼ teaspoon almond extract or ½ teaspoon vanilla extract
Instructions
Prep
- Preheat the oven to 350°F.
- Grease and flour two 8-inch round cake pans, then line the bottoms with parchment paper.
Prepare the cake
- Sift together the flour, baking powder, and salt; set aside.
- Cream the butter and granulated sugar together until light and fluffy.
- Add the egg yolks gradually, mixing well after each addition, then add the vanilla and mix until incorporated.
- Add the flour mixture and milk alternately in three additions, beginning and ending with the flour. Mix just until smooth, being careful not to overmix.
- Divide the batter evenly between the two prepared pans. Set aside.
Prepare the meringue
- In a separate bowl, beat the egg whites until frothy.
- Gradually add the sugar 1 tablespoon at a time and continue beating until stiff, glossy peaks form.
- Gently spread the meringue evenly over the batter in each pan, using an offset spatula or the back of a spoon — you don't need to go all the way to the edge.
- Sprinkle sliced almonds over the meringue in each pan.
Bake
- Bake at 350°F for 20 to 25 minutes, until the meringue is golden and a toothpick inserted into the cake comes out clean. Since the cake is very thin it cooks relatively quickly.
- Cool the layers in their pans for 10 minutes, then remove and cool completely on a wire rack.
Assemble
- Assemble the cake just before serving. You can prepare the berries and whipped cream ahead of time and store in the refrigerator.
- Prepare your whipped cream by beating the heavy cream with the sugar and almond or vanilla extract until it forms soft peaks.
- Place the first cake layer on a serving plate, meringue side up. Spread about 2/3 of the whipped cream over the top, then arrange 2/3 of the fresh berries over the whipped cream.
- Place the second cake layer on top, meringue side up. Spread the remaining whipped cream evenly over the top, then arrange the remaining berries over the whipped cream.
- A note on serving and storing: This cake is best assembled right before eating and enjoyed the same day. If you have leftovers, loosely cover with plastic wrap – or store in an airtight container – and refrigerate. It's best eaten within 1 to 2 days — the whipped cream should hold up reasonably well, but the meringue layer will gradually soften and turn a bit sticky as it absorbs moisture from the fridge and cream, and the berries will start to release liquid.